Insert menu
There are two ways to insert elements into your MEI-file: Either by typing directly MEI encoding in the editor panel (supported by code completion, see validation) or by using the insert functions listed in the Insert menu item (or rather through the corresponding keyboard shortcuts) in the notation panel.
Using the editor panel you can simply edit the encoding, changing attribute values or adding new elements. Typical text editing functions are available that you can find under Code in the menu bar such as Undo, Search or Indent selection.
Using the Insert menu functions in the menu bar (or shortcuts) to add elements is an efficient way to insert new elements. Some inserting functions comprise high-level code manipulation, such as inserting an octave element, where all referenced elements will be manipulated at the same time.
Selecting elements
If you edit directly in the notation panel you can also select multiple elements and make changes for more than one element at once. To make it easier to select slurs or less tedious to click on articulation elements like staccato dots or accents you can enable drag-select: Go to settings -> mei-friend and enable select slurs and select placement elements under drag select. Holding CTRL (CMD under macOS) while leftclicking, selecting multiple elements is possible. To click-select the entire chord element, hold ALT (OPTION under macOS) while clicking on a note inside a chord.

Select approporiate elements
Make sure that you select appropriate elements, i.e., if you select an entire measure you will not be able to insert any elements, but you will still be able to shift the pitches of all selected notes.Inserting spanning elements
To add spanning elements like a slur (or a hairpin), select the starting and ending note (notes between can also be selected, the element will be added from first to last selected) and either use Insert -> Slur or simply use the shortcut S (or H for a crescendo hairpin or SHIFT - H for a diminuendo hairpin). This will add a slur or hairpin to the notes selected. If only one note is selected, the the next note in the same layer and staff will be used as the endpoint. The <slur> element inserted to the encoding and may be edited there if necessary. You might want to add the attribute @curvedir="below" manually or just use X with the slur selected, multiple times, if necessary.
Spanning elements added this way will always have a @startid and @endid which reference the @xml:id of the starting and ending note. Equivalent to this a spanning element can also be sufficiently defined by specifying the @staff and two timestamps @tstamp and @tstamp2. This method is commonly used for hairpins.
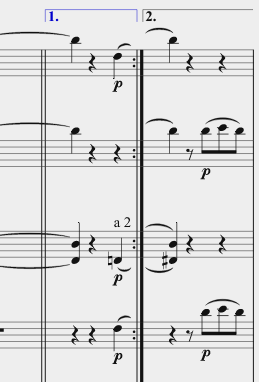
These two methods can also be mixed by using @startid with @tstamp2 or @tstamp and @endid. This method isuseful if a slur has a starting note but does not have an ending note. A typical situation would be at repeats or multiple endings (as seen in the Fig. 3).
Inserting dynamics, directives, and other control elements
A control element (such as dynamics, directives) or ornaments (trills, mordents) may be added to the selected element with the respective keyboard shortcuts (see the menu bar or the cheat sheet for a list of shortcuts). By default, a control element is added without a @place attribute (or the equivalent @curvedir in slurs). To set or change this attribute, use Invert placement (X) multiple times, if necessary. Use SHIFT - X to set @place to between, such as in piano scores (see between placement for more details). The default dynamic that is inserted is always “mf”; it can be changed by editing the string between the tags.
To insert elements with @tstamp and @tstamp2 attributes instead of start and end ids, press the CTRL (CMD under macOS) key simultaneously. Time stamp insertion is supported for these elements: slur, tie, hairpin, fermata, dir, dynam, pedal, mordent, trill, turn, glissando.
Control elements can also be inserted on multiple selected notes. mei-friend will insert the control element referring to the first (@startid) and last (@endid) selected element. Some control elements with @startid and @endid will be displayed by Verovio with a dashed extender line. You may also insert dynamics for multiple staves at once, by selecting notes from multiple staves. This will add the corresponding staff number to the @staff attribute (however, the @endid attribute should be checked in those cases).
When inserting a pedal mark (P) on multiple selected notes, a pedal down will inserted on the first and a pedal up on the last selected note.
Inserting a beam or beam span
Inserting a beam works along the same lines as above: First select the notes that the beam should span and then press B (or use the menu item). It will surround the selected notes with a beam element. When notes belong to different measures, a beamSpan should be used instead of a beam element. Inserted with SHIFT - B, it will add an element to the end of a measure with a @plist attribute referring to the elements under the beam span.
Inserting an octave element
An octave element is inserted again on a series of selected notes, pressing O for inserting the most common “8va” octave element. This will insert an octave element at the end of the measure of the first selected element, with @startid and @endid attributes pointing to the first and the last selected element and a dis and a dis.place attribute for the extent and direction of displacement. All notes selected will be processed adding an oct.ges attribute to accommodate the displacement information. To insert other displacements as the default 8 tones up (such as 15 tones down), use the modifyer keys as shown in the menu bar or cheat sheet). To delete an octave element, just use DELETE; it will remove the element and all added oct.ges attributes of the notes under the octave spanner.
Inserting a supplied element
For details, please see Critical Apparatus & Editorial Markup.
Toggling articulation
Articulation can be toggled (added or removed) by selecting a single or multiple notes and pressing the desired articulation. Select multiple notes either by drag-select or by holding the modifyer key CTRL (or CMD under macOS) and left-clicking all the notes to be selected. After articulation elements have been inserted, the remain selected; so, pressing X multiple times will set the @place attribute of the articulation elements accordingly.
For the many ways to manipulate elements and/or MEI encoding, please see Manipulating.