Annotating music encodings
Annotation is an important affordance of musical score within a variety of use-cases including music rehearsal, performance, and scholarly analysis. Currently, mei-friend features rudimentary support for different kinds of annotation, and this is a feature we are planning to develop further in the future. Feature requests on this topic, as well as other aspects of mei-friend, are gladly received!
Inline vs. stand-off annotations
mei-friend supports two distinct annotation modalities: inline annotations, created within the MEI document, using the <annot> element; and, stand-off annotations, created using external Linked Data structures which target elements within the document.
The two modalities each have their benefits and drawbacks. Inline annotations are housed within the MEI document, which is useful where they are intended to be readily available to the encoding’s audience – they are tightly coupled (indeed, part of) the MEI document they are describing. However, they can only be created by those with write-access to the MEI encoding. Of course, a user might download an MEI file from a Web server and then add <annot> elements locally; but these annotations would not be available to others viewing the file at its original location, unless it were overwritten by the newly-annotated version.
In contrast, stand-off annotations use Linked Data structures to annotate target elements within Web-hosted MEI documents. As these annotations are not housed directly within the MEI document, they must be discovered in order to be read; however, as the annotations refer directly to the MEI document in order to identify elements within it (see Targetting stand-off annotations), the targetted document can be implicitly discovered from a given annotation.
Reading and writing annotations
mei-friend currently supports reading and writing of inline annotations, and reading (loading) simple stand-off annotations stored on the Web in compliance with the Web Annotation Data Model. Writing stand-off annotations in this format, automated mapping between inline and stand-off annotations, and support for more music-specific stand-off annotation models, are planned for future development.The enrichment panel
Annotations may be generated and listed using the enrichment panel. This panel may be accessed via the menu by selecting View->Enrichment panel, via keyboard shortcut CTRL-A(or CMD-Aon a Mac), or by clicking the corresponding ‘highlighter’ icon in the panel icons area at the top-right of the interface (Fig. 1).
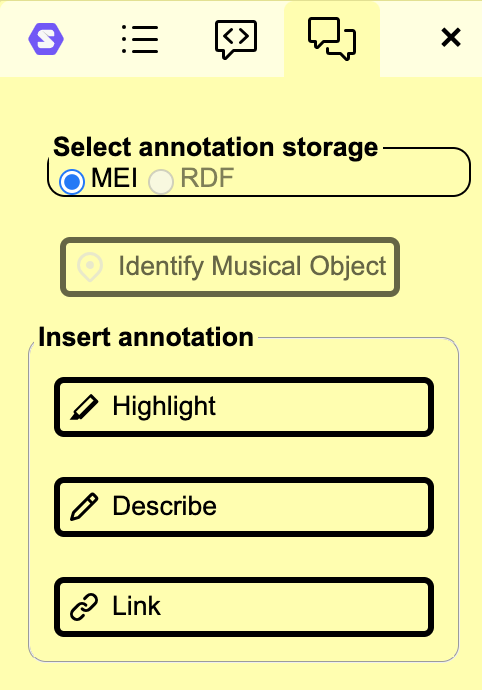
The enrichment panel has four tabs – Annotation Tools to generate annotations, Markup Tools to create editorial observations in and interventions to the text, Enrichment List to obtain a quick overview of the annotations currently present within your encoding and an option to log in to Solid.
Tools for making annotations
To generate inline annotations using mei-friend, you must first select one or more score elements that you wish to annotate. Note that each element must possess a valid @xml:id attribute in order to be annotated.
Choose among the tools available through the annotation panel to annotate your selection (Fig. 2). Currently implemented annotation types include Highlight (highlighter icon), Describe (pencil icon), and Link (chain-link icon).
Highlight
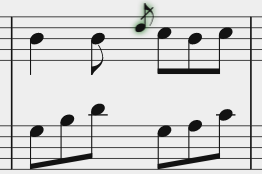
The ‘Highlight’ tool (highlighter icon) creates an inline annotation that targets each selected element: an annot element with each selected element’s @xml:id in its <annot@plist>. The <annot> is placed within the encoding at the closest valid location relative to the first selected element.
If the Show annotations setting is not disabled, the selected elements will be highlighted using green shading within the notation panel (Fig. 3).
Describe
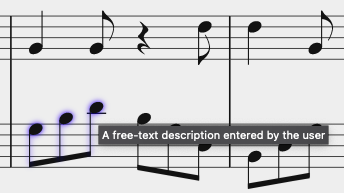
The Describe tool (pencil icon) creates an inline annotation using the same mechanism as the Highlight tool. In addition, it pops up an alert window to prompt the user to enter a textual description. This description is then entered into the body of the generated annot element as textual content.
#
Link
The Link tool (chain-link icon) creates an inline annotation using the same mechanism as the Highlight tool. In addition, it pops up an alert window to prompt the user to enter a URI (Web address). This URI is then entered into the body of the generated annot element as a ptr element with its <ptr@target> pointing to the supplied URI.
If the Show annotations) setting is not disabled, the selected elements will be highlighted using red shading within the notation panel (Fig. 3). The mouse cursor will turn into a pointer indicator when hovering over the selected elements, and a tooltip will display the URI entered by the user (Fig. 5). Clicking on a selected element will open the URI in a new browser tab.

Background: Targetting stand-off annotations
The Linked Data paradigm involves the interconnection (linking) of resources stored on the Web by reference to their Web addresses or URIs. Any MEI document stored on the Web has its own URI; for instance, the following URI is the Web address of a sample encoding of an arrangement of Beethoven’s Hymn to Joy:
You can click here to open this file using mei-friend. If you do so, you should see a number of MEI elements selected for you: eight notes forming the first half of the opening phrase of the verse in the trombone part. Each of these notes has an @xml:id associated with it; in this case, d1e5417, d1e5433, and so on. Each @xml:id can be turned into a globally-unique URI referencing the specified note within this particular Web-hosted MEI file, using a concept called URI fragments. This works by taking the URI of the MEI file as provided above, and appending a # symbol, followed by the respective @xml:id, like so:
- https://raw.githubusercontent.com/music-encoding/sample-encodings/main/MEI_4.0/Music/Complete_examples/Beethoven_Hymn_to_joy.mei#d1e5417
- https://raw.githubusercontent.com/music-encoding/sample-encodings/main/MEI_4.0/Music/Complete_examples/Beethoven_Hymn_to_joy.mei#d1e5433
- and so on.
Identifiers and URI fragments
Any MEI element identified with an@xml:id can be refered to by a URI using the 'fragments' approach discussed above, as long as the MEI file itself has a URI (i.e., is hosted on the Web). Conversely, MEI elements must have an @xml:id to be referenced via a URI.
Different Linked Data structures of varying complexity and abstraction may be used to annotate MEI elements by reference to their (fragment) URIs. Currently, mei-friend supports annotations adhering to the Web Annotation Data Model, but support of more music-specific annotation models – see further reading – is under development.